分类
商品


- 商品
- 店铺
- 资讯
关于华为交换机配置教程搜集整理了一下,从基础组网,对接防火墙、多种方式的设备登录开始,一直到安全认证、故障处理,内容比较全面细致。近期更新一下,更新完了之后做一个汇总。有需要的可以关注一下。
这篇文章我们来了解一下,使用二层交换机与防火墙对接上网时,交换机如何配置。
如图所示,交换机Switch和防火墙对接,使用户PC1和PC2可以实现上网功能。交换机是二层交换机,仅能实现二层转发。
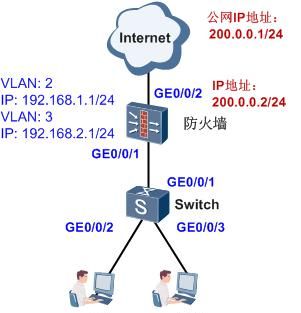
交换机基于接口划分VLAN,实现二层转发。
防火墙的配置有两种情况(这里使用的是USG防火墙):
一种是防火墙的接口是三层口,通过配置子接口终结VLAN功能,实现和交换机的通信。
一种是防火墙的接口是二层口,通过配置VLANIF接口,实现和交换机的通信。
交换机的配置步骤(共2步)
第一步:配置下行连接用户的接口。
<Switch> system-view
[Switch] vlan batch 2 3[Switch] interface gigabitethernet0/0/2[Switch-GigabitEthernet0/0/2] port link-type access
[Switch-GigabitEthernet0/0/2] port default vlan 2[Switch-GigabitEthernet0/0/2] quit
[Switch] interface gigabitethernet0/0/3[Switch-GigabitEthernet0/0/3] port link-type access
[Switch-GigabitEthernet0/0/3] port default vlan 3[Switch-GigabitEthernet0/0/3] quit
第二步:配置上行连接防火墙的接口。
[Switch] interface gigabitethernet0/0/1[Switch-GigabitEthernet0/0/1] port link-type trunk[Switch-GigabitEthernet0/0/1] port trunk allow-pass vlan 2 3[Switch-GigabitEthernet0/0/1] quit
防火墙的接口作为三层口,通过配置子接口终结VLAN进行通信的配置步骤(共5步)
第一步:配置终结子接口。
<USG> system-view[USG] vlan batch 2 3[USG] interface gigabitethernet0/0/1.1[USG-GigabitEthernet0/0/1.1] vlan-type dot1q 2[USG-GigabitEthernet0/0/1.1] ip address 192.168.1.1 24[USG-GigabitEthernet0/0/1.1] quit[USG] interface gigabitethernet0/0/1.2[USG-GigabitEthernet0/0/1.2] vlan-type dot1q 3 [USG-GigabitEthernet0/0/1.2] ip address 192.168.2.1 24[USG-GigabitEthernet0/0/1.2] quit
第二步:配置DHCP和DNS功能,为内网用户分配IP地址和指定DNS服务器地址。
[USG] dhcp enable[USG] interface gigabitethernet0/0/1.1[USG-GigabitEthernet0/0/1.1] dhcp select interface[USG-GigabitEthernet0/0/1.1] dhcp server dns-list 114.114.114.114 223.5.5.5[USG-GigabitEthernet0/0/1.1] quit[USG] interface gigabitethernet0/0/1.2[USG-GigabitEthernet0/0/1.2] dhcp select interface[USG-GigabitEthernet0/0/1.2] dhcp server dns-list 114.114.114.114 223.5.5.5[USG-GigabitEthernet0/0/1.2] quit
第三步:配置域并开启域间策略。
[USG] firewall zone trust[USG-zone-trust] add interface gigabitethernet0/0/1[USG-zone-trust] add interface gigabitethernet0/0/1.1 [USG-zone-trust] add interface gigabitethernet0/0/1.2[USG-zone-trust] quit[USG] firewall zone untrust[USG-zone-untrust] add interface gigabitethernet0/0/2[USG-zone-untrust] quit[USG] firewall packet-filter default permit all
第四步:配置公网接口的IP地址和静态路由。
[USG] interface gigabitethernet0/0/2 [USG-GigabitEthernet0/0/2] ip address 200.0.0.2 255.255.255.0[USG-GigabitEthernet0/0/2] quit[USG] ip route-static 0.0.0.0 0.0.0.0 200.0.0.1
第五步:配置NAT功能,使内网用户可以访问外网。
[USG] nat address-group 1 200.0.0.2 200.0.0.2[USG] nat-policy interzone trust untrust outbound[USG-nat-policy-interzone-trust-untrust-outbound] policy 1[USG-nat-policy-interzone-trust-untrust-outbound-1] policy source 192.168.0.0 0.0.255.255[USG-nat-policy-interzone-trust-untrust-outbound-1] action source-nat[USG-nat-policy-interzone-trust-untrust-outbound-1] address-group 1[USG-nat-policy-interzone-trust-untrust-outbound-1] quit[USG-nat-policy-interzone-trust-untrust-outbound] quit
防火墙的接口作为二层口,通过VLANIF进行通信的配置步骤(共5步)
第一步:配置VLANIF接口。
<USG> system-view[USG] vlan batch 2 3[USG] interface gigabitethernet0/0/1 [USG] portswitch [USG-GigabitEthernet0/0/1] port link-type trunk[USG-GigabitEthernet0/0/1] port trunk permit vlan 2 3 [USG-GigabitEthernet0/0/1] quit[USG] interface vlanif 2[USG-Vlanif2] ip address 192.168.1.1 24[USG-Vlanif2] quit[USG] interface Vlanif 3[USG-Vlanif3] ip address 192.168.2.1 24[USG-Vlanif3] quit
第二步:配置DHCP和DNS功能,为内网用户分配IP地址和指定DNS服务器地址。
[USG] dhcp enable[USG] interface vlanif 2 [USG-Vlanif2] dhcp select interface[USG-Vlanif2] dhcp server dns-list 114.114.114.114 223.5.5.5[USG-Vlanif2] quit[USG] interface vlanif 3 [USG-Vlanif3] dhcp select interface[USG-Vlanif3] dhcp server dns-list 114.114.114.114 223.5.5.5[USG-Vlanif3] quit
第三步:配置域并开启域间策略。
[USG] firewall zone trust[USG-zone-trust] add interface gigabitethernet0/0/1[USG-zone-trust] add interface Vlanif 2 [USG-zone-trust] add interface Vlanif 3[USG-zone-trust] quit[USG] firewall zone untrust[USG-zone-untrust] add interface gigabitethernet0/0/2[USG-zone-untrust] quit[USG] firewall packet-filter default permit all
第四步:配置公网接口的IP地址和静态路由。
[USG] interface gigabitethernet0/0/2 [USG-GigabitEthernet0/0/2] ip address 200.0.0.2 255.255.255.0[USG-GigabitEthernet0/0/2] quit[USG] ip route-static 0.0.0.0 0.0.0.0 200.0.0.1
第五步:配置NAT功能,使内网用户可以访问外网。
[USG] nat address-group 1 200.0.0.2 200.0.0.2[USG] nat-policy interzone trust untrust outbound[USG-nat-policy-interzone-trust-untrust-outbound] policy 1[USG-nat-policy-interzone-trust-untrust-outbound-1] policy source 192.168.0.0 0.0.255.255[USG-nat-policy-interzone-trust-untrust-outbound-1] action source-nat[USG-nat-policy-interzone-trust-untrust-outbound-1] address-group 1[USG-nat-policy-interzone-trust-untrust-outbound-1] quit[USG-nat-policy-interzone-trust-untrust-outbound] quit
这样二层交换机与防火墙对接上网的配置就完成了。
下一篇为大家介绍一下三层交换机与防火墙的对接,欢迎持续关注。
更新完了之后会做一个汇总放在主页栏目里面。
上一篇:华为交换机配置教程 1.基础组网 二、三层交换机在局域网中的应用


送码官方微信


")


![[-私房摄影-] 婚礼情绪人像沟通视频拍摄服装场景布光构图教程35](https://www.songma.com/upload/14607/1597675994-14607/0862408001597676098tp14607-1.jpg)


 手机访问领取大礼包