分类
商品


- 商品
- 店铺
- 资讯
上次网易实习面试问到了VueRouter的原理,现在手写一个简单的Router(hash模式)。
首先,需要在index.html先引入vue.js文件
<script src="https://cdn.jsdelivr.net/npm/vue"></script> 根据平常vue-router的使用,我们最后需要实现这样的效果:
//定义三个组件 const Home = { template: '<div>这是home组件</div>' } const mine = { template: '<div>这是个人信息组件</div>' } const book = { template: '<div>这是书籍首页</div>' } //定义路由数组 const routes = [ { path: '/', component: Home }, { path: '/mine', component: mine }, { path: '/book', component: book, } ] //新建路由对象 const router = new Router(Vue, {routes}); var vue = new Vue({ el: '#app', router })根据上面的代码,可以看到Router是一个构造函数,接受两个参数。第一个参数是挂载Vue,第二个是路由数组。这里我使用ES6的class来实现Router。
//Router.js class Router { constructor(vm, options) { this.map = {}; this.app = new Vue({ data: { currentPath: '/' } }) this.init(options); this.initComponent(vm); }}这里为什么要把currentPath挂在vue实例上?这是由于每次改变hash之后,需要通过自己设置组件router-view重新渲染,假如是直接定义在Router上,是不会重新渲染的。也就是说,假如改成this.currentPath = '/', 改变hash页面不会发送变化。
init(options) { window.addEventListener('hashchange', this.onHashChange.bind(this)); //map存放path到component的映射 options.routes.forEach(item => { this.map[item.path] = item.component; }) } onHashChange() { this.app.currentPath = this.getHash(); } getHash() { return window.location.hash.slice(1) || '/'; }在init方法中监听hashchange,这也是hash模式的核心。同时把path到component的映射存放到map中以便查找。
//定义router-link 和 router-view组件 initComponent(vm) { Vue.component('router-link', { props: {to: String}, template: '<a :href="to"><slot></slot></a>' }); const _this = this; Vue.component('router-view', { render(h) { /* * 假如currentPath不是定义在vue实例上, * render将不会执行。 */ var component = _this.map[_this.app.currentPath]; return h(component); } }); }initComponent方法实现了两个全局自己设置组件 router-link 和 router-view。
/* * router.push() 这里只实现了接受字符串和含有query的对象形式 */ push() { this.setLocation('push', arguments[0]); } //同上 replace() { this.setLocation('replace', arguments[0]); } setLocation(type, args) { //参数为字符串形式 if(typeof args === 'string') { this.setHash(type, args); } //参数为对象 else if(typeof args === 'object') { if(args.path) { var url = args.path; if(args.query) { url += '?'; //遍历query所有属性,拼接到url for(let k in args.query) { url += `${k}=${args.query[k]}&` } //把最后一个&截掉 url.splice(url.length-1, 1); } this.setHash(type, url); } } } /* * 修改hash */ setHash(type, url) { if(type === 'push') window.location.hash = url; else { var location = window.location; if(location.href.indexOf('#') !== -1) { url = location.href.slice(0, location.href.indexOf('#') + 1) + url; } //这是在刚进入首页,url中还没有# else { url = location.href + '#' + url; } window.location.replace(url); /* * 执行replace可以修改hash但不会触发hash的变化,起因是url是由我们拼接而来 * 所以需要手动执行一次onHashChange() */ this.onHashChange(); } } }最后定义了push和replace方法,push通过window.location.hash实现,replace通过window.location.replace()实现。
因为在执行replace()修改hash时,是通过拼接的方式修改hash,并不会触发hashchange事件,所以最后手动执行了一个onHashChange()修改内部的currentPath。
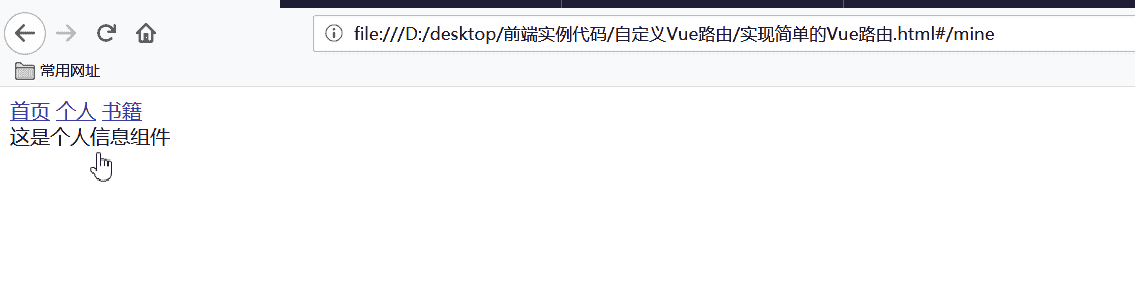
<div id="app"> <router-link to="#/">首页</router-link> <router-link to="#/mine">个人</router-link> <router-link to="#/book">书籍</router-link> <router-view></router-view></div>进入首页,此时url中没有hash,显示的是首页组件。
 图片.png
点击个人:
 图片.png
点击书籍:
 图片.png
通过push('/')修改hash:
 图片.png
通过push({path: '/book'})修改hash:
 图片.png
假如文章对你有所帮助,请给个?。


送码官方微信


")


 手机访问领取大礼包