
 截屏2020-10-13上午5.24.57.png
最近一直理解人脸检测的算法,所以也尝试学多人脸检测框架。所以这里将拿出来和大家分享一下
Retinaface 与普通的目标检测算法相似,在图片上预先设定好少量先验框,这些先验框会分布在整个图片上,网络内部结构会对这些先验框进行判断看能否包含人脸,同时也会调整位置进行调整并且给每一个先验框的一个置信度。
在 Retinaface 的先验框不但要取得人脸位置,还需要取得每一个人脸的五个关键点位置
接下来我们对 Retinaface 执行过程其实就是在图片上预先设定好先验框,网络的预测结果会判断先验框内部能否包含人脸并且对先验框进行调整取得预测框和五个人脸关键点。
MobileNet 网络是由 google 团队在 2017 年提出的,专注手机端和嵌入式设施中轻量级 CNN 网络,在大大减少模型参数与运算量下,对于精度只是小幅度下降而已。
 retinanet_001.png
 retinanet_002.png
在主干网络输出的相当输出了不同大小网格,用于检测不同大小目标,先验框默认数量为 2,这些先验框用于检测目标,而后通过调整得到目标边界框。
class FPN(nn.Module): def __init__(self,in_channels_list,out_channels): super(FPN,self).__init__() leaky = 0 if (out_channels <= 64): leaky = 0.1 # 利用 1x1 卷积对取得的3有效特征层进行通道数的调整,输出通道数都为 64 self.output1 = conv_bn1X1(in_channels_list[0], out_channels, stride = 1, leaky = leaky) self.output2 = conv_bn1X1(in_channels_list[1], out_channels, stride = 1, leaky = leaky) self.output3 = conv_bn1X1(in_channels_list[2], out_channels, stride = 1, leaky = leaky) self.merge1 = conv_bn(out_channels, out_channels, leaky = leaky) self.merge2 = conv_bn(out_channels, out_channels, leaky = leaky) def forward(self, input): # names = list(input.keys()) input = list(input.values()) # output1 = self.output1(input[0]) output2 = self.output2(input[1]) output3 = self.output3(input[2]) # 对于最小特征层进行上采样来取得 up3 up3 = F.interpolate(output3, size=[output2.size(2), output2.size(3)], mode="nearest") # 而后将最小特征层经过上采用取得结果和中间有效特征层进行相加 output2 = output2 + up3 # 进行 64 通道卷积进行特征整合 output2 = self.merge2(output2) # 这个步骤和上面相似 up2 = F.interpolate(output2, size=[output1.size(2), output1.size(3)], mode="nearest") output1 = output1 + up2 output1 = self.merge1(output1) out = [output1, output2, output3] return outclass SSH(nn.Module): def __init__(self, in_channel, out_channel): super(SSH, self).__init__() assert out_channel % 4 == 0 leaky = 0 if (out_channel <= 64): leaky = 0.1 self.conv3X3 = conv_bn_no_relu(in_channel, out_channel//2, stride=1) # 用 2 个 3 x 3 的卷积来代替 5 x 5 的卷积 self.conv5X5_1 = conv_bn(in_channel, out_channel//4, stride=1, leaky = leaky) self.conv5X5_2 = conv_bn_no_relu(out_channel//4, out_channel//4, stride=1) # 使用 3 个 3 x 3 的卷积来代替 7 x 7 的卷积 self.conv7X7_2 = conv_bn(out_channel//4, out_channel//4, stride=1, leaky = leaky) self.conv7x7_3 = conv_bn_no_relu(out_channel//4, out_channel//4, stride=1) def forward(self, input): conv3X3 = self.conv3X3(input) conv5X5_1 = self.conv5X5_1(input) conv5X5 = self.conv5X5_2(conv5X5_1) conv7X7_2 = self.conv7X7_2(conv5X5_1) conv7X7 = self.conv7x7_3(conv7X7_2) # 堆叠 out = torch.cat([conv3X3, conv5X5, conv7X7], dim=1) out = F.relu(out) return out深度可分离卷积好处就是可以减少参数数量,从而降低运算的成本。经常出现在少量轻量级的网络结构(这些网络结构适合于移动设施或者者嵌入式设施),深度可分离卷积是由DW(depthwise)和PW(pointwise)组成
 convolutional_filter.jpg
这里我们通过比照普通卷积神经网络来解释,深度可分离卷积是如何减少参数
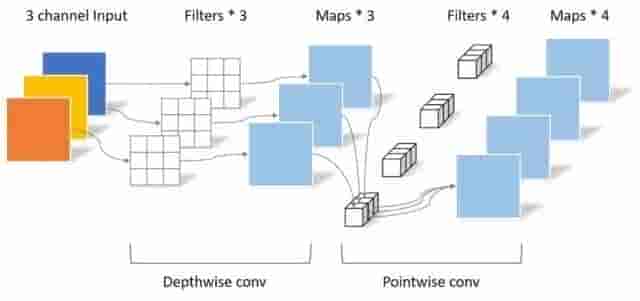 DW_PW.jpeg
我们先看图中 DW 部分,在这一个部分每一个卷积核通道数 1 ,每一个卷积核查应一个输入通道进行计算,那么可想而知输出通道数就与卷积核个数以及输入通道数量保持一致。
简单总结一下有以下两点
PW 卷积核核之前普通卷积核相似,只不过 PW 卷积核大小为 1 ,卷积核深度与输入通道数相同,而卷积核个数核输出通道数相同
| 常规卷积 | |
|---|---|
| 输入 |  |
| 卷积核 |  |
| 输出 |  |
| 参数量 | 108 |
普通卷积
深度可分离卷积
 表示输入矩阵大小
 表示卷积核大小
 表示输入通道数
 表示输出通道数
 和
和


