

手机端进阶之选:手机端开发者也能轻松搭建的服务器
笔者最近收到了挺多用户端的留言,用户端在等待后端接口的时候遥遥无期,其实用户端只要要几步就能简单搭建一个后端,用于调试接口的,本期就简单搭建一个后端,用于用户端调试接口。相关代码已放于 github
使用开发工具IDEA,新建一个spring-boot项目:
IDEA下载地址为:http://www.jetbrains.com/idea/download/#section=windows 下载Ultimate版本JDK下载地址为:https://www.oracle.com/technetwork/java/javase/downloads/index.html 下载对应的JDK版本就可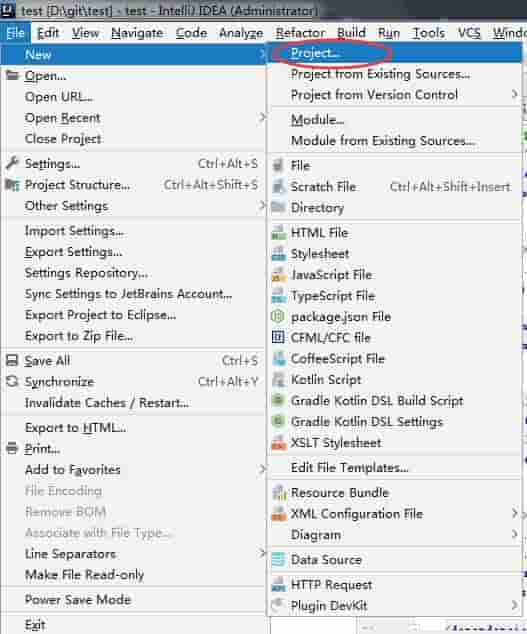 image
image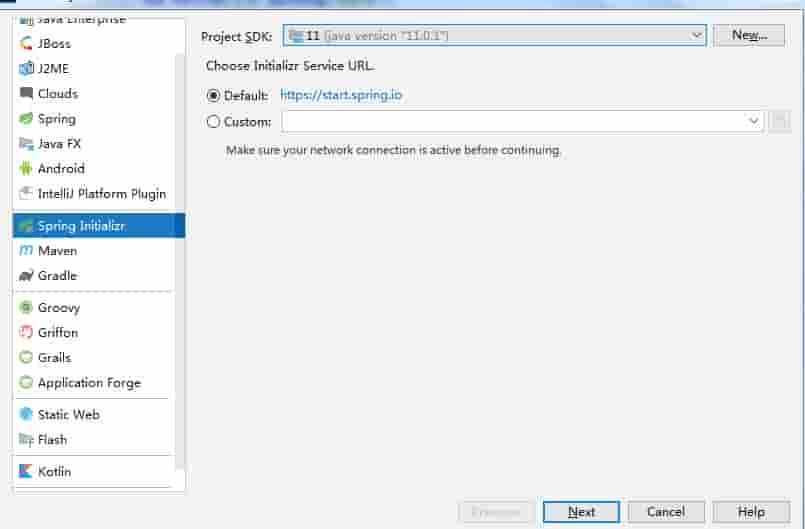 image
image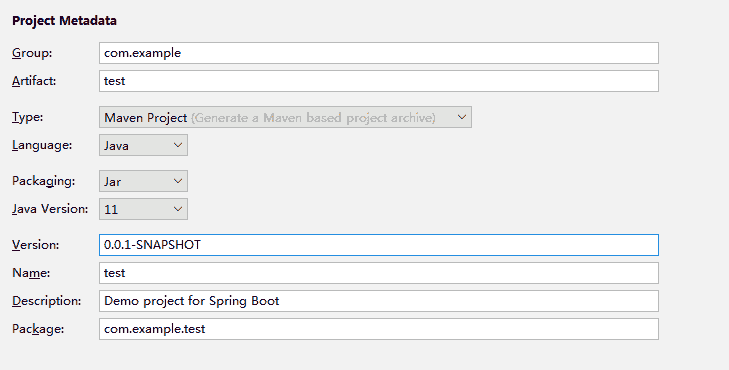 image
image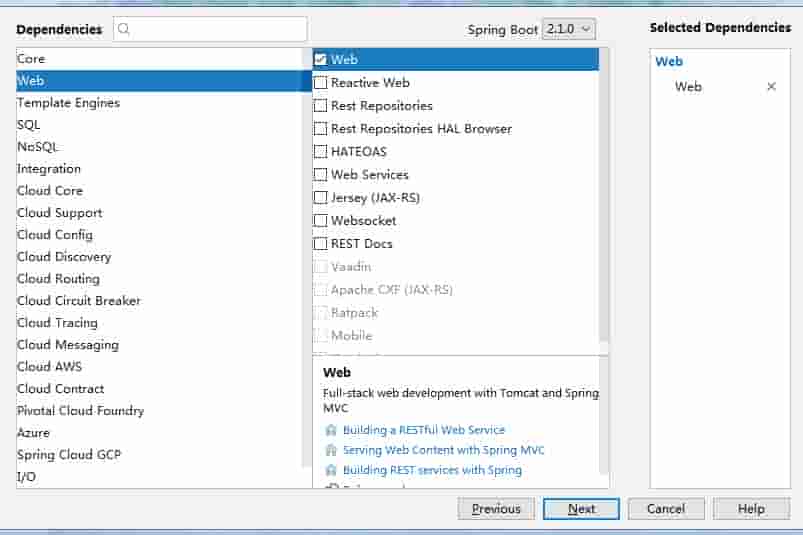 image
image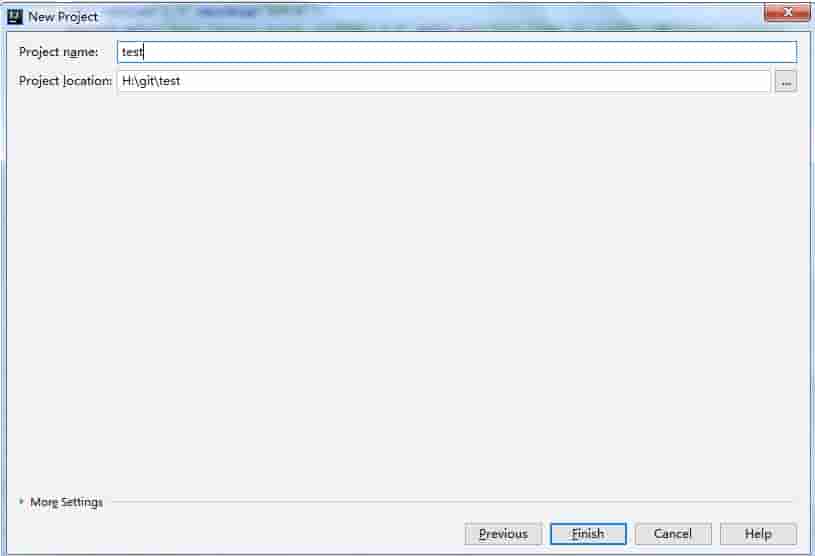 image
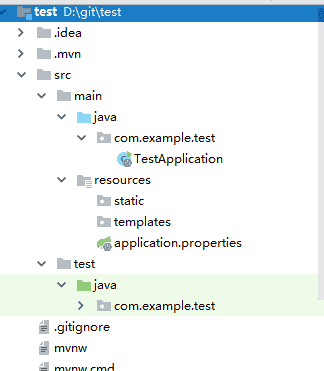
image点击finish后,一个sping-boot的基础项目已经创立好了。
 image
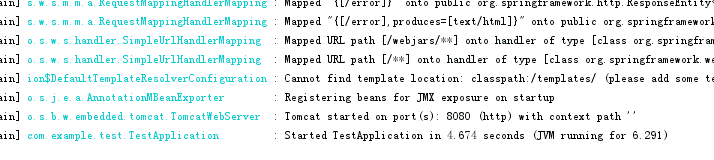
imageTestApplication直接run就能启动项目了的
 image
imageapplication.properties这个是项目的少量配置,举例一下默认是8080端口,我们假如想改下端口的话,即可以在配置添加
server.port: 8089这样子启动的时候端口就更改了的
 image
image项目的请求地址为:http://本机IP:8089
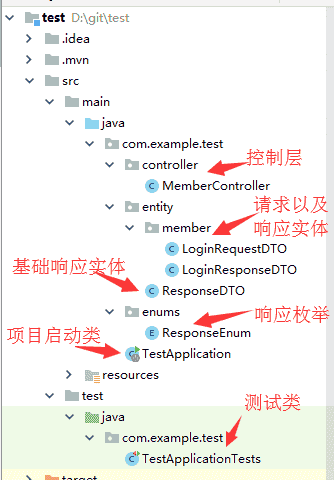
如图创立对应的目录以及创立对应的实体类:
 image
image在项目启动类 TestApplication设置HttpMessageConverters的JSON格式输出为fastjson:
package com.example.test;import com.alibaba.fastjson.serializer.SerializerFeature;import com.alibaba.fastjson.support.config.FastJsonConfig;import com.alibaba.fastjson.support.spring.FastJsonHttpMessageConverter;import org.springframework.boot.SpringApplication;import org.springframework.boot.autoconfigure.SpringBootApplication;import org.springframework.boot.autoconfigure.http.HttpMessageConverters;import org.springframework.context.annotation.Bean;import org.springframework.http.MediaType;import java.util.ArrayList;import java.util.List;@SpringBootApplicationpublic class TestApplication { /** * JSON格式输出使用fastjson * @return */ @Bean public HttpMessageConverters fastJsonHttpMessageConverters() { FastJsonHttpMessageConverter fastConverter = new FastJsonHttpMessageConverter(); FastJsonConfig fastJsonConfig = new FastJsonConfig(); fastJsonConfig.setSerializerFeatures(SerializerFeature.PrettyFormat,SerializerFeature.DisableCircularReferenceDetect,SerializerFeature.WriteNullStringAsEmpty); //时间格式化 fastJsonConfig.setDateFormat("yyyyMMddHHmmss"); fastConverter.setFastJsonConfig(fastJsonConfig); //因为新版本fastjson设置了MediaType为'/',所以需要手动加入所需的MediaType List<MediaType> supportedMediaTypes = new ArrayList<>(); //添加JSON的MediaType supportedMediaTypes.add(MediaType.APPLICATION_JSON); supportedMediaTypes.add(MediaType.APPLICATION_JSON_UTF8); //下面的都是扩展的 supportedMediaTypes.add(MediaType.APPLICATION_ATOM_XML); supportedMediaTypes.add(MediaType.APPLICATION_FORM_URLENCODED); supportedMediaTypes.add(MediaType.APPLICATION_OCTET_STREAM); supportedMediaTypes.add(MediaType.APPLICATION_PDF); supportedMediaTypes.add(MediaType.APPLICATION_RSS_XML); supportedMediaTypes.add(MediaType.APPLICATION_XHTML_XML); supportedMediaTypes.add(MediaType.APPLICATION_XML); supportedMediaTypes.add(MediaType.IMAGE_GIF); supportedMediaTypes.add(MediaType.IMAGE_JPEG); supportedMediaTypes.add(MediaType.IMAGE_PNG); supportedMediaTypes.add(MediaType.TEXT_EVENT_STREAM); supportedMediaTypes.add(MediaType.TEXT_HTML); supportedMediaTypes.add(MediaType.TEXT_MARKDOWN); supportedMediaTypes.add(MediaType.TEXT_PLAIN); supportedMediaTypes.add(MediaType.TEXT_XML); fastConverter.setSupportedMediaTypes(supportedMediaTypes); fastConverter.setFastJsonConfig(fastJsonConfig); //将fastjson增加到视图消息转换器列表内 return new HttpMessageConverters(fastConverter); } public static void main(String[] args) { SpringApplication.run(TestApplication.class, args); }}pom.xml里面的dependencies添加如下配置:
<dependency> <groupId>com.alibaba</groupId> <artifactId>fastjson</artifactId> <version>1.2.47</version></dependency>创立响应的基础DTO(entity目录):
在entity文件目录单击右键 image
image创立名为ResponseDTO的实体类并且实现序列化(Serializable 可以使你将一个对象的状态写入一个Byte 流里(序列化),并且可以从其它地方把该Byte 流里的数据读出来(反序列化))
package com.example.test.entity;import com.example.test.enums.ResponseEnum;import java.io.Serializable;/** * @author Dwyane. * @date 2018-11-12 */public class ResponseDTO<T> implements Serializable { private static final long serialVersionUID = -4109110629830724000L; /** * 响应code */ private String responseCode; /** * 响应形容 */ private String responseDesc; /** * 响应的内容 */ private T data; private ResponseDTO() { } public ResponseDTO(ResponseEnum responseEnum) { this(responseEnum, null); } public ResponseDTO(String responseCode, String responseDesc) { this.responseCode = responseCode; this.responseDesc = responseDesc; } public ResponseDTO(T data, ResponseEnum responseEnum) { this(responseEnum); this.data = data; } public ResponseDTO(T data, String responseCode, String responseDesc) { this.responseCode = responseCode; this.responseDesc = responseDesc; this.data = data; } public ResponseDTO(ResponseEnum responseEnum, String extend) { if (responseEnum != null) { this.responseCode = responseEnum.getResponseCode(); this.responseDesc = responseEnum.getResponseDesc() + (extend == null ? "" : "(" + extend + ")"); } } public static <T> ResponseDTO<T> buildSuccess(T data) { return new ResponseDTO<>(data, ResponseEnum.SUCCESS); } public static <T> ResponseDTO<T> buildSuccess() { return new ResponseDTO<>(ResponseEnum.SUCCESS); } public static <T> ResponseDTO<T> buildFail() { return new ResponseDTO<>(ResponseEnum.FAIL); } public static <T> ResponseDTO<T> buildError() { return new ResponseDTO<>(ResponseEnum.ERROR); } public static <T> ResponseDTO<T> buildEnum(T data, ResponseEnum responseEnum) { return new ResponseDTO<>(data, responseEnum); } public static <T> ResponseDTO<T> buildEnum(ResponseEnum responseEnum) { return new ResponseDTO<>(responseEnum); } public String getResponseCode() { return this.responseCode; } public void setResponseCode(String responseCode) { this.responseCode = responseCode; } public String getResponseDesc() { return this.responseDesc; } public void setResponseDesc(String responseDesc) { this.responseDesc = responseDesc; } public T getData() { return this.data; } public void setData(T date) { this.data = date; }}创立响应的基础枚举(enums目录):
在enums文件目录单击右键创立class时选择Enum的枚举类
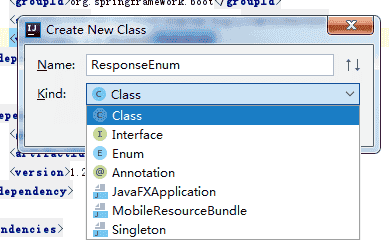 image
imagepackage com.example.test.enums;/** * @author Dwyane. * @date 2018-11-12 */public enum ResponseEnum { SUCCESS("0000","成功"), ERROR("9999","服务器异常"), FAIL("9998","失败"), ; /** * 返回代码 */ public String responseCode; /** * 返回形容 */ public String responseDesc; ResponseEnum(String responseCode, String responseDesc) { this.responseCode = responseCode; this.responseDesc = responseDesc; } /** * 获取 返回代码 * * @return 返回代码 */ public String getResponseCode() { return this.responseCode; } /** * 获取 返回形容 * * @return 返回形容 */ public String getResponseDesc() { return this.responseDesc; }}创立请求的实体类和响应的实体类(entity目录下的member目录):
package com.example.test.entity.member;import javax.validation.constraints.NotNull;/** * @author Dwyane. * @date 2018-11-9 */public class LoginRequestDTO { @NotNull private String mobile; @NotNull private String pwd; public String getMobile() { return mobile; } public void setMobile(String mobile) { this.mobile = mobile; } public String getPwd() { return pwd; } public void setPwd(String pwd) { this.pwd = pwd; }}package com.example.test.entity.member;/** * @author Dwyane. * @date 2018-11-9 */public class LoginResponseDTO { private String mobile; private String name; public String getMobile() { return mobile; } public void setMobile(String mobile) { this.mobile = mobile; } public String getName() { return name; } public void setName(String name) { this.name = name; }}创立一个controller(controller目录):
package com.example.test.controller;import com.example.test.entity.ResponseDTO;import com.example.test.entity.member.LoginRequestDTO;import com.example.test.entity.member.LoginResponseDTO;import com.example.test.enums.ResponseEnum;import org.springframework.web.bind.annotation.PostMapping;import org.springframework.web.bind.annotation.RequestBody;import org.springframework.web.bind.annotation.RequestMapping;import org.springframework.web.bind.annotation.RestController;import javax.validation.Valid;/** * @author Dwyane. * @date 2018-11-12 */@RestController@RequestMapping("/member")public class MemberController { @PostMapping("/login") public ResponseDTO<LoginResponseDTO> login(@Valid @RequestBody LoginRequestDTO requestDTO) throws Exception{ //todo 校验账号密码 //校验好了,返回客户信息给到用户端 LoginResponseDTO response = new LoginResponseDTO(); response.setMobile(requestDTO.getMobile()); response.setName("test"); return new ResponseDTO<>(response, ResponseEnum.SUCCESS); }}在test目录下创立一个简单的调试类:
package com.example.test;import com.example.test.entity.member.LoginRequestDTO;import org.junit.Test;import org.junit.runner.RunWith;import org.springframework.beans.factory.annotation.Autowired;import org.springframework.boot.test.context.SpringBootTest;import org.springframework.boot.test.web.client.TestRestTemplate;import org.springframework.http.HttpEntity;import org.springframework.http.HttpHeaders;import org.springframework.http.HttpMethod;import org.springframework.http.ResponseEntity;import org.springframework.test.context.junit4.SpringRunner;@RunWith(SpringRunner.class)@SpringBootTest(webEnvironment = SpringBootTest.WebEnvironment.RANDOM_PORT)public class TestApplicationTests { @Autowired protected TestRestTemplate restTemplate; /** * 登录单元测试 * * @throws Exception */ @Test public void login() throws Exception { LoginRequestDTO requestDTO = new LoginRequestDTO(); requestDTO.setMobile("12345678910"); requestDTO.setPwd("123"); HttpEntity<LoginRequestDTO> formEntity = new HttpEntity<>(requestDTO, new HttpHeaders()); ResponseEntity<String> exchange = restTemplate.exchange("/member/login", HttpMethod.POST, formEntity, String.class); System.err.println(exchange.getBody()); }}直接单击右键测试类run就可:
{"responseDesc":"成功","data":{"mobile":"12345678910","name":"test"},"responseCode":"0000"}这样一个简单的接口调用项目已经完成了。
iOS 开发者也可以用以下 swift 代码请求接口(安卓请求也简单,在此不予列出)
// 输入自己电脑连接的ip , 我的是以下ip ,其中 8089 是端口号var urlStr = "http://192.168.1.113:8089/member/login"var url:NSURL! = NSURL(string: urlStr)let request:NSMutableURLRequest = NSMutableURLRequest(url: url as URL)//设置为POST请求request.httpMethod = "POST"request.setValue("text/html", forHTTPHeaderField: "Content-Type")//设置参数var params = "{'mobile':122, 'pwd':112}"let data = params.data(using: .utf8)request.httpBody = data//默认session配置let config = URLSessionConfiguration.defaultlet session = URLSession(configuration: config)//发起请求let dataTask = session.dataTask(with: request as URLRequest) { (data, response, error) in // let str:String! = String(data: data!, encoding: NSUTF8StringEncoding) // print("str:/(str)") //转Json let jsonData:NSDictionary = try! JSONSerialization.jsonObject(with: data!, options: .mutableContainers) as! NSDictionary print(jsonData)}//请求开始dataTask.resume()得出如下结果:
{
data = {
mobile = 122;
name = test;
};
responseCode = 0000;
responseDesc = "\U6210\U529f";
}
至此,一个完整的、简单的后端搭建完成,用户端的朋友们,是不是觉得很简单? 如有疑问,欢迎留言,笔者第一时间回复,谢谢关注!
欢迎关注公众号「程序员大咖秀」
